Introduction
In this documentation, we will show you how to use the 3D Clean Plate feature to achieve better keying with tracked cameras.
The 3D Clean Plate generator captures the texture of your green background and applies it to a 3D model of the green background that moves together with the real one, allowing you to create a Clean Plate that follows your camera movements.
To take advantage of the 3D Clean Plate feature, there are a few requirements.
- You must have an Aximmetry Broadcast & Film Edition to use this feature.
- You must have a reliable and accurate tracking system.
3D Clean Plate Setup
Studio Mask Method (Recommended)
Beginning with version 2025.3.0, the 3D Clean Plate generator can use the studio mask's Curved - Green Area Mode without requiring an imported 3D model. However, the Cube - Green Area Mode is not compatible with the 3D Clean Plate generator.
If your studio is more complex than what the Curved - Green Area Mode can generate, you should use the Custom Model - Green Area Mode.
Once you have set up the studio mask, you can proceed to the Capturing the Clean Plate section.
If you are using an Aximmetry version older than 2025.3.0, you must use the Custom Model Method for 3D Clean Plate.
Custom Model Method
- You must have an accurate 3D model of your green background.
- From version 2025.3.0, you must use Custom Model - Green Area Mode. This model can be the same as your 3D CleanPlate model.
Model Requirements
There are a few methods to acquire a model of your green background:
- Use the model that was used to build your studio.
- Create a model based on measurements.
- Use a 3D scanner tool/application
NOTE: Models created with 3D scanner tools/applications usually require cleanup after the scanning has been done, as they usually contain unnecessary parts of your studio that can be removed.
Your model must meet some very important criteria to be used with the 3D Clean Plate Generator.
These criteria are:
- You should try to match your real studio in size as much as possible, but if it is a few centimeters smaller, it is okay.
- The model's pivot point must be on the floor at 0 height.
- The model must not have overlapping faces.
- The model must be properly UV unwrapped. There should not be overlapping vertices in the UV map.
- Aximmetry must be able to triangulate the model.
- The model must not have any material applied to it.
- It must be in either of the following file formats: .fbx, .obj, or .dae.
Aximmetry Setup
This documentation assumes that you are familiar with setting up a virtual studio with a Tracked Camera and using Aximmetry's own keyer.
If not, please click on the links above to learn more.
After loading your scene, you should see something like this in the Flow Editor:
Using Aximmetry's native render engine:
Using Unreal Engine:
Importing the Custom Studio Model
You should import your 3D model into Aximmetry by dragging and dropping it into the Flow Editor.
Set up the connections like so:
NOTE: In earlier versions of Aximmetry, you should connect the Clean Plate model to the Cleanplate Model pin of the TrackedCam compound.
NOTE: In earlier versions of Aximmetry, connecting your Green Model is optional, but from 2025.3.0 it is mandatory.
Technically, you could connect the same model that you connected to the Margin Model, but to avoid artifacts on the edges, we suggest making the Green Model a little bit smaller than your Margin Model.
Important: The 3D model must not have any material applied to it.
To make sure that it does not have any material applied to it, right-click on the model's compound and select Set Importer Options...
In the pop-up window, uncheck "Import materials" and click OK.:
Aligning the Model with the Real-World Studio
In versions 2025.3.0 and up, the alignment is automatically taken from the studio mask, and you can move on to Capture a Clean Plate.
Versions prior to 2025.3.0
The following section only applies to versions prior to 2025.3.0
Older versions of Aximmetry require alignment by hand for the 3D Clean Plate model.
Go to the INPUTS control board and select the Keyed in the MONITOR panel.
This will also select the KEYER panel.
In the KEYER panel's property editor, change the KEYER TYPE to CLEAN PLATE 3D GENERATOR:
Using the Transformation property, position the 3D model so that it matches your real-world studio.
You can use the Blended Wireframe monitor mode to see the 3D model as a grid if you find it easier to align this way:
Important: The height of the 3D model should not be changed.
Capturing the Clean Plate
Go to the INPUTS control board and select the Keyed in the MONITOR panel.
This will also select the KEYER panel.
In the KEYER panel's property editor, change the KEYER TYPE to CLEAN PLATE 3D GENERATOR:
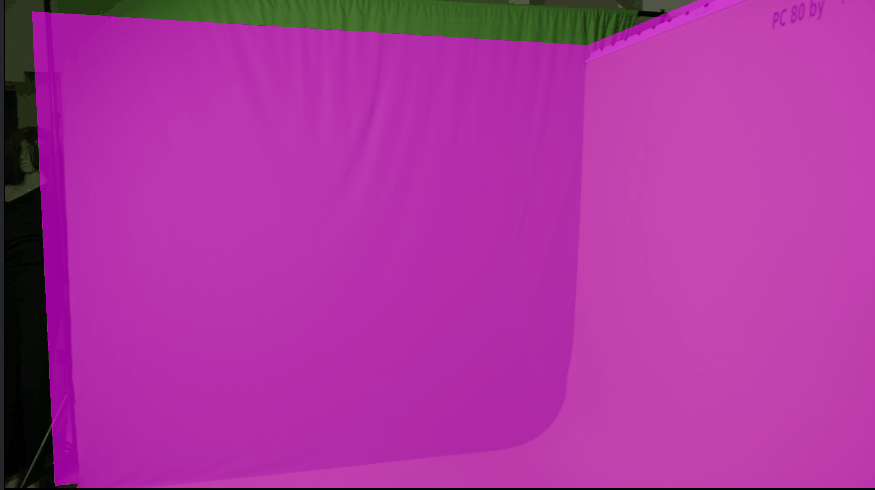
By default, the Monitor Mode is set to Blended Cropped, which allows you to see both the camera image and the 3D model of your studio with a semi-transparent purple shader:
Meaning of the other monitor modes:
- Original: Displays the raw camera image without any modifications or overlays.
- Clean Plate: In this mode, only the Clean Plate is visible, either with a purple shader or with the captured texture.
- Blended: Overlays the Clean Plate onto the raw camera image.
- Blended Cropped: Overlays the Clean Plate onto the raw camera image and darkens the cropped edges, which have been trimmed by the Crop Fraction.
- Blended Wireframe: Displays a wireframe representation of the 3D model of the Clean Plate, showing the structure and geometry of the model.
To capture the 3D Clean Plate, you need to look at your green screen from an arbitrary point of view. Then press Capture in the KEYER panel:
This will capture the part of the green screen displayed in the center of the image:
You should then rotate your camera a bit and click Capture again; this will capture another part of the green screen.
NOTE: Only the inner portion of the captured image is used for creating the Clean Plate's texture. This area is defined by the Crop Fraction. The Crop Fraction helps to prevent artifacts at the edges caused by the camera's lens(for example, vignetting), which can result in an imperfect texture.
Using the Clean Plate
Once you have finished creating the Clean Plate, switch back to the Advanced B Keyer Type.
Turn on Use Clean Plate to utilize the Clean Plate's image instead of the Background Color:
Proceed with Aximmetry's keyer setup process to key the video input's image.


