Introduction
Aximmetry Eye is an application developed for smartphones to be used for various virtual production functions, such as:
- Camera device
- Camera, Talent, or Object tracking
- Preview monitor
This document describes how to use the Aximmetry Eye application for virtual production.
You can download Aximmetry Eye from the Apple App Store using the following link: https://apps.apple.com/us/app/aximmetry-eye-vp-xr-tools/id6448943747.
NOTE: Aximmetry Eye is yet only available for iOS v16.0+ devices. To learn more about compatible iOS devices, please refer to the following document:
Aximmetry Eye - Supported Devices
IMPORTANT: Aximmetry Eye is only compatible with Aximmetry version 2024.3.0 or later.
Opening the Application for the First Time
After opening Aximmetry Eye for the first time, the application will ask if you'd like to receive notifications.
After allowing the notification, you can see the Connections view.
Connecting to Aximmetry
Aximmetry Eye will ask permission to search and connect to devices on the available networks.
IMPORTANT: This permission is necessary since, without it, the application could not connect to your Aximmetry PC.
Aximmetry Eye lists all the available Aximmetry connections on your network.
Click on Connect to connect to the PC running Aximmetry.
NOTE: Aximmetry Composer has to be actively running on the PC to be listed as an 'AVAILABLE MACHINE' and to be able to connect to it.
Selecting 'Auto connect' will connect to that same PC each time you start up Aximmetry Eye.
NOTE: We recommend using a wired Ethernet connection for the most stable connection to the PC. It is also recommended to create a subnetwork free of any other traffic that could cause noise on the network.
If you would like to read more about the wired connection option, please refer to the following connection: Using Aximmetry Eye with Wired Connection.
You can also enter the IP address of the Aximmetry PC into the IP address field. Alternatively, you could select the PC from the 'AVAILABLE MACHINES' list.
NOTE: If you need help finding your PC's IP address, please refer to the next section of the document.
How to Find the IP Address for my PC
Open the network settings in the Windows Settings.
Click on Properties:
You can find your PC's IP address under 'IPv4 address':
Streaming
Selecting the Streaming option, you can choose to set up an SRT stream to any application.
Selecting the Devices
In the next step, you can select what to use the application for:
- Send camera stream - Send the camera feed from the mobile into the Aximmetry PC.
- Send tracking data - Use the mobile as a tracking device.
- Receive preview stream - Stream any video output of Aximmetry to the mobile.
By clicking 'Start', Aximmetry Eye will automatically create the selected devices in Aximmetry, so you don't have to create anything in the Aximmetry PC's Manage Devices menu.
The following devices will be created (if they are selected):
- SRT video input - Aximmetry Eye Camera -
- Camera Tracking - AximmetryEye:52001 -
- SRT video output - Aximmetry Eye Preview -
IMPORTANT: In the case where Aximmetry Eye is used to provide both video input and camera tracking at the same time, in Aximmetry Composer the Tracking Delay value must be set to 0, and the Timecode Sync must be turned On.
NOTE: In the Broadcast & Film Edition, you have the option to disable HTTP control. For the automatic creation to work, the HTTP control has to be enabled. By default, the HTTP control is enabled; you can check it by opening 'Preferences/HTTP Control' and selecting the 'Enable HTTP control' checkbox:
Camera View
After the initial setup is done, we arrive at the camera view:
There are more buttons to talk about here; the buttons and their respective functions are as follows:
- Turning automatic rotation on and off. (NOTE: If the rotation is turned off in the operating system settings, then it has to be turned on first.)
- Exposure and white balance settings.
- Reset the virtual environment's position. More on this later.
- Application settings.
- Opening the Preview stream pip view.
- Starting and stopping the streaming.
- Locks the screen and dims the brightness. You can undo the dimming and unlock the screen by using the slider.
NOTE: The available functions may vary depending on your device's capabilities.
Preview Monitor
If the preview monitor functionality is enabled, it will appear on top of the camera view in picture-in-picture mode.
Anything that is exposed to the 'SRT video output - Aximmetry Eye Preview' device will be visible on the preview monitor.
You can switch between the preview monitor and the camera view to be in full screen, using this button: .
You can also minimize the smaller screen, using this button: .
NOTE: Screenshots demonstrating the moment before minimizing the smaller screen (left, highlighting the minimize button's position), and after minimizing the smaller screen (right).
Application Settings
In the application settings menu, you can specify the parameters of the different functions.
- Device name - Specify the unique name for the device here. It will be used in Aximmetry for the Tracking and the Video device creation.
Camera
- Send camera stream - If it is turned on, the application will send the video feed from the phone's camera.
- Latency (ms) - You only have to change this value if the Round Trip Time (RTT) is too long and the transmission is breaking up. With higher latency, there will be more time to recover lost packets.
- Format - The resolution and framerate that will be used for the video stream.
- Bitrate (Mbps) - The video bitrate in megabits per second. Wired connections allow for a higher bitrate.
- Enable audio - If this setting is turned on, then the audio from the phone will also be sent alongside the video.
Tracking
- Send tracking data - If this is turned on, then the phone will send its positional information.
- Show position data on UI - If this is turned on, then the positional information will be visible on top of the Camera View
- Frame rate - You can specify the frame rate for the tracking data here. This field is only active if the camera stream is not sent.
Preview
- Receive preview stream - If this setting is turned on, then the phone can receive the preview stream from Aximmetry.
- Bitrate (Mbps) - The video bitrate in megabits per second. This setting changes the Bitrate of the Aximmetry preview stream. This setting can also be modified in Aximmetry, under the Manage devices/Video out/SRT menu.
NOTE: Wherever you change the settings (in Aximmetry Eye or Aximmetry Composer), the last change will apply to the bitrate.
Store
- Aximmetry Eye Subscriptions (no watermark)
- Aximmetry Eye is freely accessible with all its functions and capabilities. The free version applies a watermark to all of the video feeds. If you wish to remove the watermark, you can do so by purchasing a subscription from the application.
Defining the Origin of the Virtual Environment
Using Aximmetry Eye
By clicking on the 'Reset' button, you can define the origin of the virtual environment. The actual position of the phone will become the new origin of the virtual environment. Usually, there is no need to reset the origin using this method; instead, it is recommended to use the method stated below.
Using the Aximmetry PC
Alternatively, you could use the Aximmety PC to define the origin of the virtual environment, using an ArUco marker.
IMPORTANT: This requires a specific ArUco marker (6x6, ID70) in a specific size (180x180mm).
NOTE: You can download it from here: Aximmetry Eye ArUco marker
NOTE: Or you can generate the same exact marker here: https://chev.me/arucogen/. (Required settings: Dictionary: 6x6; Marker ID: 70; Marker size, mm: 180)
First, place the ArUco marker into the camera view, like so: 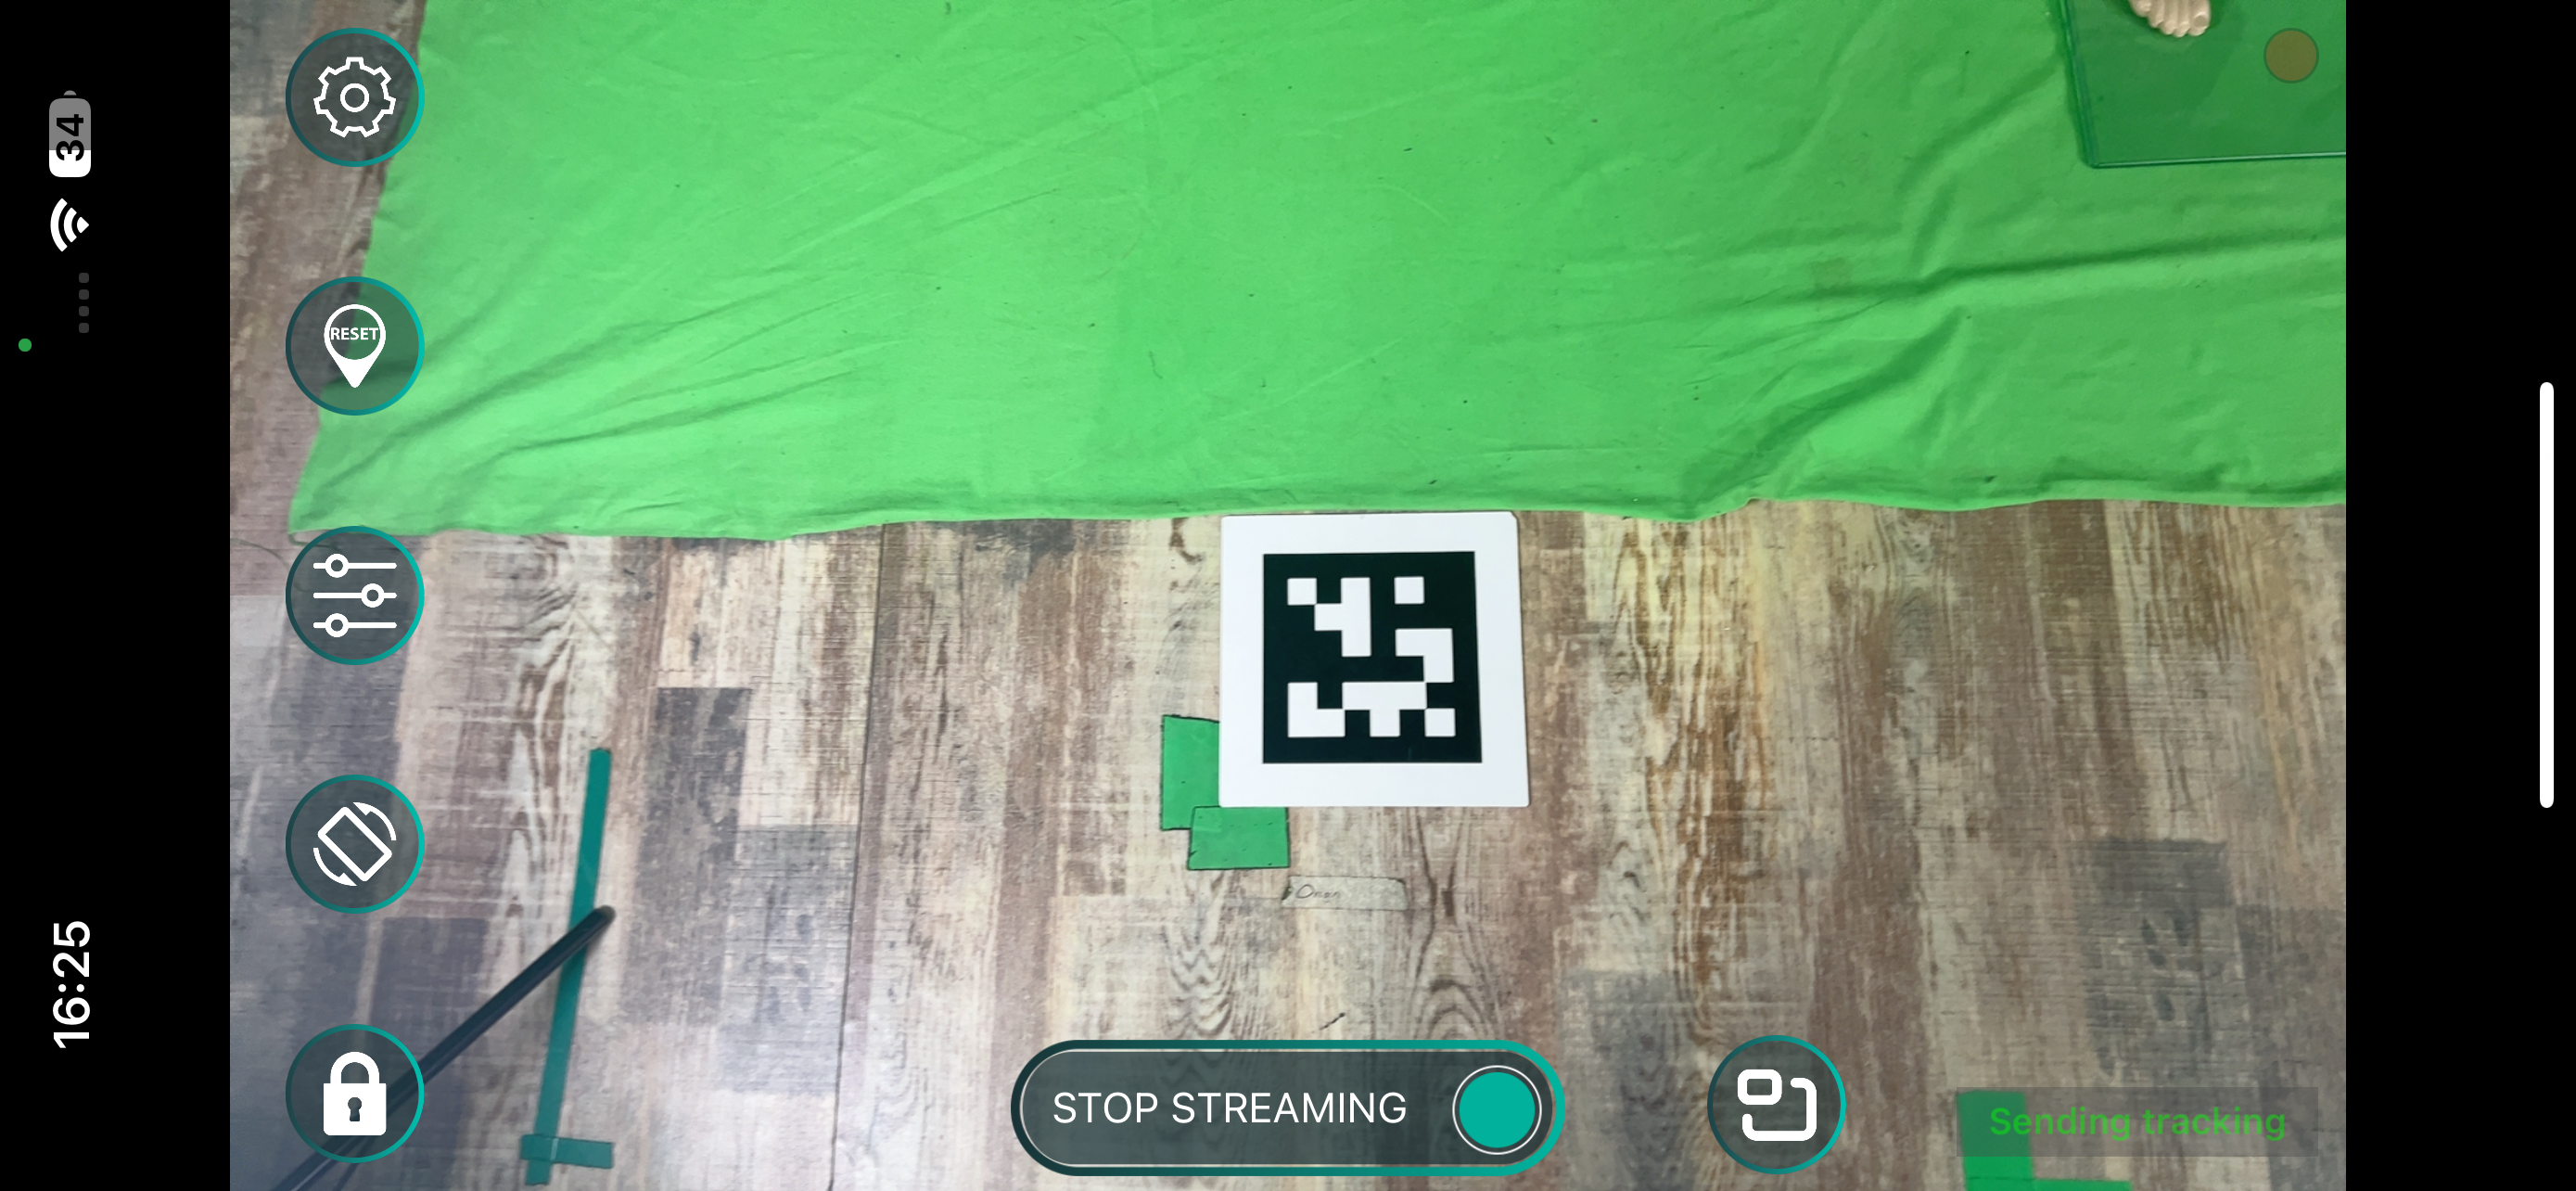
On the Aximmetry PC, open the 'Inputs' control board, select the 'Origin X' control panel, and click on the 'Detect origin' pin's Trigger button:
By clicking on the trigger, Aximmetry will place the virtual environment's origin where the ArUco marker is placed.
Thermal Preparations
During production using a smartphone, the device can get quite hot. If the device overheats, the application will start stuttering.
To keep the smartphone at an optimal temperature, it is recommended to remove any case from the device, to allow the phone to utilize all the airflow.
While cases can protect the devices from any drops, they also keep the heat in, considerably reducing the smartphones' capacity for heat dissipation.
Additionally, you could use external coolers to cool the phone during production.
Example of an external cooler:


