Introduction
In this document, we will describe how to implement controls over the Unreal project by sending data from Aximmetry. This will require the use of AX Scene Editor. Additionally, we will cover how to transmit video content from the Unreal project back to Aximmetry.
These capabilities are particularly useful for users looking to gain finer manipulation over their scenes, such as moving objects, adjusting light intensities, starting animations, and managing models or textures from Aximmetry.
Level Blueprint
All operations mentioned in this document will be conducted within the AX Scene Editor's Level Blueprint. The Level Blueprint is a specialized type of blueprint, functioning as a global event graph for an entire level.
To access the Level Blueprint, select the Blueprints icon within the editor and choose Open Level Blueprint:
Aximmetry Blueprint Nodes
AX Scene Editor includes specialized blueprint nodes capable of receiving data from Aximmetry.
To add these nodes within a blueprint, perform a right-click in the empty space of the Event Graph. Then, look for the Aximmetry category in the node list to find all available Aximmetry blueprint nodes:
These nodes are designed to handle distinct data types, including Color, Integer, Logical, Scalar, Text, Transformation, Trigger, Vector, and Video. For the Video data type, it's also possible to send video content from an Unreal project to Aximmetry.
After updating the pin list by clicking the red chain link button on the Unreal Project module in Aximmetry, the blueprint nodes will appear as pins:
In Live Sync Mode, the chain link button appears automatically when the Play button is pressed in the AX Scene Editor. However, in cooked mode, the project must be cooked for the chain link button to appear.
Typically, an Aximmetry blueprint node includes the following pins:
- Name: Sets the pin's name within Aximmetry's Unreal Project module. Providing a name is mandatory.
- Order Index: Determines the pin's listing order within Aximmetry's Unreal Project module. Higher Order Index numbers result in lower pin positioning, except for 0-indexed pins, which are placed at the very end.
- Default Value: Establishes the pin's default value within Aximmetry's Unreal Project module, if the pin is not connected.
- Return Value: The value that is received from Aximmetry.
The Name, Order Index, and Default Value pins are static. Meaning that they are unaffected by connections to these pins in the blueprint.
NOTE: If multiple objects within a scene have the same blueprint (not Level Blueprint), they can only receive identical data from the Aximmetry node. Because the static nature of the node's name prevents dynamic distinction between objects. To facilitate object-specific data handling, it's necessary to create separate blueprints for each object or implement a method for parsing the data uniquely for each object.
NOTE: All the Aximmetry blueprint nodes are built into the AX Scene Editor. They are not available in the vanilla version of the Unreal Engine.
Examples
Get Aximmetry Logical
The Logical pin data type functions as a binary ON/OFF switch within Aximmetry, enabling straightforward toggling of elements in the Unreal project of AX Scene Editor.
For example, to hide an actor object:
First, add an object to the Level Blueprint by dragging and dropping it from the outliner:
NOTE: Only Level Blueprints allow referencing objects from the Outliner due to their direct connection to the scene (level).
Next, add and connect the Set Actor Hidden In Game, Get Aximmetry Logical, and Event Tick nodes:
NOTE: Event-type nodes have a special execution pin, which triggers the activation of a blueprint node. In the case of the Event Tick node, the execution pin triggers execution at every frame. The execution pin mechanism is unique to Unreal. In contrast, Aximmetry's Flow Editor adopts a more automatic system for module execution.
In Aximmetry, the red chain link button should appear, and after clicking on it, the logical pin (Hide Floor) will be added to the Unreal Project module. The pin's state can be toggled on and off from within the Pin Values panel if the Unreal Project module is selected:
Get Aximmetry Transformation
The Transformation pin data type represents the spatial combination of position, rotation, and scale.
This is particularly useful for moving objects within a scene in Aximmetry, without the need to frequently alternate between AX Scene Editor and Aximmetry. Additionally, it facilitates dynamic object movements, for example, by using animations in Aximmetry.
In this section, you will learn how to control the Transformation of an actor object from within Aximmetry.
Initially, ensure the object is set to Movable; otherwise, it cannot be relocated after the scene starts running. This option is located in the Transform section within the Details panel:
Next, add the object to the blueprint. Similar to the previous section, drag and drop objects from the Outliner into the Level Blueprint. In our example, a Cube-like object is used for demonstration.
Then add and connect the Set Actor Transform, Get Aximmetry Transformation, and Event Tick nodes:
NOTE: If the object is not an actor, an alternative node to Set Actor Transform may be required.
Once the Transformation appears in Aximmetry after clicking the chain link button .
There are several methods to manipulate the object's transformation. Here, we outline three common methods:
- Pin Value Edit:
To accurately set static position values, edit the created transformation pin of the Unreal Project module on the Pin Values panel: - Direct Value Control:
For dynamic control over individual transformation values, use the Transformation Compose and Vector Merge modules: - Using Sequencer for Animation:
To create animations that alter the object's transformation over time, pair the Sequencer module with a Sequence Node module: - Using Scene Node Module:
A practical way to control the transformation is to add a Scene Node module and connect its World Transf pin (initially concealed — reveal it by clicking the expand list button at the upper right corner) to the Unreal Project module's pin, which was created in the scene's Blueprint:
Activate Edit mode by choosing a preview window in the Edit / Edit Scene On menu or by using the quick button on the menu bar:
NOTE: Make sure the Preview pin of the camera compound is connected to the preview's output channel.
Select the Scene Node module, which enables transformation adjustments for the object directly on the preview screen: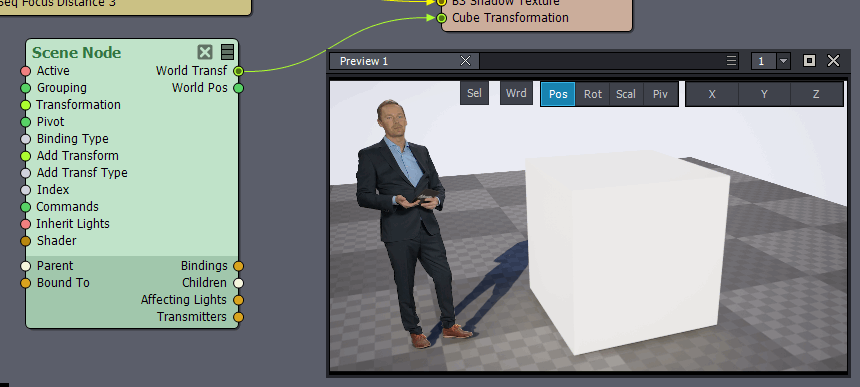
For detailed information on the Edit Scene On feature, visit the Transformation Gizmo and Edit Scene Settings documentation.
NOTE: To convert positions or transformations from Unreal to Aximmetry's coordinate system, use the [Common_Studio]:Compounds\Tools\Unreal_Transformation.xcomp compound.
NOTE: It's possible to break the transform pins in the blueprint into vectors and then down to their scalar elements by using the Split Struct Pin option multiple times. This can be accessed by right-clicking on the pin:
Get Aximmetry Trigger
The Trigger pin data type functions as a start or stop signal that can be used to start/stop various animations or timing functions.
Add and connect the Get Aximmetry Trigger, Event BeginPlay, Bind Event to Trigger, and Custom Event nodes.
The Bind Event to Trigger node is only searchable if the Context Sensitive search is turned off.
The Event BeginPlay node must be used instead of the Event Tick node from the previous examples.
Connect the desired blueprint logic to the CustomEvent's execution pin. For instance, in our example, we linked the activation of a particle system to the event:
To copy and paste the above nodes into the Blueprint editor, click on this box: , press CTRL + A to select all text and CTRL + C to copy it, then in the Level blueprint press CTRL + V to paste it.
In Aximmetry, utilizing the trigger pin can be achieved through various methods. One practical approach involves placing the trigger on a Control Board as a button. This can be achieved by using a Control Board and a Pin Collector special compound:
This setup allows convenient access to trigger the particle system within your production:
NOTE: It is possible to expose the other types of Get Aximmetry nodes to the Control Board.
Get Aximmetry Video
The Video pin data type can function as a video frame or an image (static texture).
This technique is often used to create virtual screens (like televisions) within the scene. For detailed examples, follow the Virtual Screens in Unreal from Aximmetry document.
Gamma Correction Option
The Get Aximmetry Video blueprint node features an S RGB pin, which dictates whether the received video is treated as sRGB or linear.
S RGB should be enabled for textures containing color information (camera footage, etc., that will be rendered into the scene) and disabled for textures used in shader numerical calculations (e.g., normal maps, masks). This option impacts only 8-bit textures, as Unreal considers all non-8-bit and floating-point textures to be linear.
Video from Unreal Project
Currently, passing data from the Unreal project of AX Scene Editor to Aximmetry is limited to video outputs, but it will be expanded in the future to cover other data types.
The Set Aximmetry Video blueprint node enables sending a texture (such as a camera view captured through Scene Capture 2D) to Aximmetry. It is possible to use multiple Set Aximmetry Video outputs by assigning distinct names to each.
The Set Aximmetry Video itself does not perform any gamma correction. The generated output depends on the settings and pixel format of the connected texture or render target. The default output is always treated as sRGB regardless of pixel format.
Without Set Aximmetry Video nodes in the scene, the Unreal Project module's default output mirrors the scene as it would be displayed on the screen by Unreal, functioning similarly to an invisible Set Aximmetry Video node labeled “out”. This default output's format can be configured in Edit / Project Settings - Rendering / Default Settings / Frame Buffer Pixel Format:
Context Sensitive
By default, not every blueprint node is displayed when attempting to add a new blueprint node.
Should you find that a particular blueprint node is not listed, turning off the Context Sensitive search option will expose all available blueprint nodes:


